
Published: 21 April, 2019
- Share
-

-

-

Building a website in WordPress is pretty easy and with a little help from a designer and developer, you can customize a WordPress theme to do pretty much anything you want it to.
But that doesn’t mean that you’re set up for SEO success right out of the box. There are some important considerations that you’ll want to address to make sure you’re building a site that’s both user-friendly and search-engine-friendly.
Here is a checklist for every WordPress developer to build an SEO-optimized WordPress site.
Get Reliable Hosting
Page speed and site up-time are very important. Having pages that load slowly, or don’t load at all, creates a poor user experience and that’s a big red flag for Google.
You can test your page speed times with Google PageSpeed Insights and you want your pages to load in 1.5 seconds or less. If you have any slow-loading pages, Google PageSpeed Insights is also a great way to identify what’s dragging them down. Common ways to improve your pagespeed include:
- optimizing & compressing images,
- minimizing/compressing JavaScript,
- removing unnecessary code and CSS,
- using a content delivery network (CDN) if you are a medium to large website with lots of static content and get a large amount of traffic, and
- leverage caching with a tool like W3 Total Cache.
Some web servers are just slow. If you can’t quite crack why things are taking so long, you might want to take a look at your hosting package.
Take Safety Precautions with a Security Plugin
It’s estimated that about 30% of the internet on WordPress. It’s one of the most used platforms and one of the most hacked platforms. You need to do your part to set up security for your website and we recommend Wordfence and Securi, two stable plugins that can help prevent serious disasters.
Set up your SSL Certificate
More and more frequently, clicking on an http listing in the search results will bring you to a browser warning about non-secure content on the pages. If you don’t want people to get “This site is not secure!” warnings, you’ll want to have that SSL certificate in place. Furthermore, Google slightly favours secure sites over non-secure sites (it’s one of many ranking factors) so you should have it in place for that competitive advantage. You can purchase an SSL certificate from your hosting provider and they can help you set it up, or your dev team can help you set it up.
Gating Your Site
When you’re building the new site, you’ll likely have it gated so that the staged site doesn’t get index. This is best practice. Requiring people (and search engines) to have a password to access the staged site prevents your competition from seeing what you’re up to and prevents those pages from popping up in the search engines.
A login page to gate your content is not the same as adding rel=noindex, rel=nofollow to your site.
Noindex/Nofollow
When you’re first setting up your WordPress site it will ask you if you want to “Discourage search engines from indexing this site”. Checking this will add a noindex/nofollow tag to your site which tells they search engines “hey, please don’t include this page in the search results or follow any of the links from it” and the search engines might comply, or they might not.
Adding a noindex tag does not ensure that your content will not be crawled, indexed, or included in the search results.
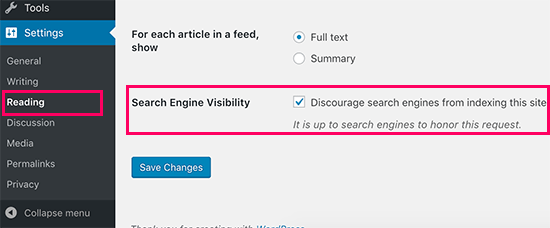
When you launch… be sure to check all pages for noindex tags. This is one of the most common mistakes at launch and can prevent your nice new site from showing in the search results.
Set your URL structure
The default URL structure for WordPress isn’t the #1 choice for most SEOs.
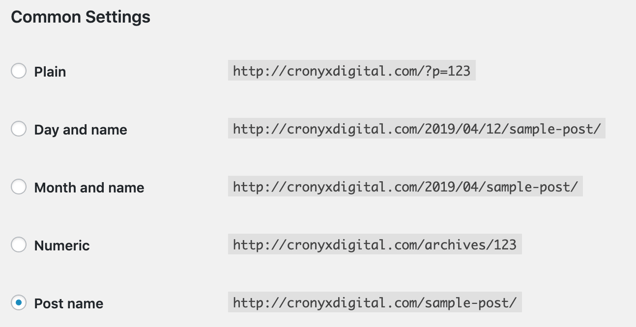
By default, WordPress will often use the Plain ‘?p=[id]’ for the page URLs. This means that when you publish a page it generates a page ID that is used in the page URL. For blog posts, the default is to include the publish date in the URL. Because this adds additional folders and creates a sloppy user experience, it is recommended that you revise this to be ‘Post name’ so that you have some nice keyword-optimized URLs when you add in your nice, keyword-optimized blog post title.
Tips for Writing Optimized URLs
If you are setting up a site that is going to replace an existing one, you’ll want to keep your URLs the same. Unless they really, really suck, then you’ll want to follow this guide for writing amazing URLs:
1. Title = URL
Your page title should be descriptive to what the page is about. It’s likely the name of the page in WordPress and the <h1> tag on the page. A page about “Tips for Writing Optimized URLs” should have the title “Tips for Writing Optimized URLs”. If you are using the Post Name URL generator in WordPress, your URL will by default look like this:
https://www.domain.com/tips-for-writing-optimized-urls
2. Make sure case doesn’t matter
Some servers will load up a URL regardless of if it’s uppercase, lowercase or a MiXtUrE of both. Others require that the type case match EXACTLY for a URL to resolve. It is strongly recommended that your URLs not be case sensitive.
3. Avoid punctuation!
If your URLs are auto-generating, they sometimes get punctuation pulled into them. If you can, adjust your settings to automatically strip out punctuation from your URLs. If you can’t make that happen automatically, just keep an eye out for it and remove punctuation from the URL prior to publishing your page.
4. KISS (or, KISCKO?)
Keep it short, concise and keyword optimized. When you’re publishing blog posts you might have some titles that are lengthy and when those auto-populate as URLs they create some super long URLs. In these scenarios, before you publish that post, edit your URL to remove stop words and things that might be catchy headlines but don’t matter for your URL.
https://www.domain.com/headline-showdown:-10-articles-face-off-to-see-who-can-give-you-all-the-feels.-#7-had-me-in-tears!
Can easily become this 👇 without losing anything important.
https://www.domain.com/10-articles-face-off-to-give-you-all-the-feels
5. Have your SSL certificate in place
Your URLs should all be https and requests for http URLs should be redirected/resolving as https.
6. Keep naming standardized (https://www)
Pick your naming standard and make it consistent across the site. I prefer https://www for every single page and requests for non-https or non-www to be redirected to the https://www.
You can set your preferred version as the WordPress Address URL and Site Address URL in your WP backend under Settings > General.

If you need to add in the redirects for non-www to www, here is a helpful guide.
Redirect URLs that you’re renaming or no longer using
There are going to be some pages that don’t make the cut over to the new site, or that really just need a URL refresh. For any domain that is changing or ceasing to exist, make sure you put a 301 redirect in place so any old links to that page send the visitor to a different useful page instead of a 404 error page.
Make a pre-launch sitemap to test post-launch
Make a sitemap of every single page on your site - use a crawler if you need to. Include landing pages, thank you pages, blog tags, etc. and after your site launches, check every single one of those links to ensure that they all resolve with the new site design or redirect the visitor to the right page.
Install an .xml sitemap plugin
If your site is more than just a handful of pages, you’ll want to have an .XML sitemap. This is a list of all the pages on your site that Google looks for to make sure that they are crawling and indexing all that you’ve got. Your XML sitemap should be located at www.domain.com/sitemap.xml.
A good WordPress plugin to automatically create and update sitemaps is Google XML Sitemaps by Arne Brachhold.
Check your 404 page
When you're building a new site, the 404 page often gets overlooked. Make sure you have a custom error page in place and that it’s helpful for anyone who sees it. Very few people will be on your error page intentionally, so do them a solid and help them find the page they’re looking for.
Install an SEO plugin
Installing a good SEO plugin is a must because it can take care of numerous SEO aspects of your website and blog automatically. I personally prefer using Yoast SEO by Team Yoast. It covers everything I’ve needed it to and more. This basis plug-in (or one just like it) can help you optimize your title tags, meta description tags, add your Google Analytics, verify with Google Search Console and more. There are lots of good tools out there are you may find another one that fits the bill better for what you need it for, but of all the ones I’ve worked with, Yoast SEO is my go-to.
Add Google Analytics Tracking Code
If you are working on a site that was already collecting data, use the same code and make an annotation in your reports for the day you go live. I’d also recommend keeping analytics code off the staging site so that you’re not inflating the data for the live site. If this is a fresh build, you can slap that code up on the site any time -- preferably before you launch!
Enable Rel=Canonical
Using canonical tags helps you identify to Google what page is the main page (the “canon”) when you have two or more pages that are similar. For instance, if I have a page listing shoes that you can sort by size, color, price, etc., and that generate different URLs, I’d want to specify that the main category page with no filters attached to the URL is the main one, so that it gets the search engine love I want it to.
Use a caching plugin to speed up your blog
A caching plugin is a must for any WordPress site. Caching plugins do two useful things. Firstly, they make your website faster. Secondly, they reduce the load on your web server. Most caching plugins cache static and dynamic content to decrease the page loading times. One such awesome plugin for WordPress is W3 Total Cache. It’s feature-rich with page caching, browser caching, object caching, database caching and minification options. A good alternative to it would be WP Super Cache, which generates and serves static .html pages to speed up WordPress sites. The goal behind decreasing webpage load times is to improve user experience. Search engines also give fast sites more edge in SERPs. So, if you make your website faster, naturally it’ll be good from an SEO viewpoint.
Turn of comments

The conversation has shifted. While some people might comment on a page or post on your website and have something insightful, helpful or nice to say, that’s generally not the case for 99% of website comments. Most comments are just spam and people who have something real to say about the content are doing it on social media.
To save yourself the time of trying to decipher if you have a sophisticated spammer or an unsophisticated commenter, just turn off the comments. Encourage people to share on social and you’ll be working to build a bigger audience in the process.
Internal link all the things
While you’re adding in the content, think ‘what other content do I have that’s relevant to this’? Resources, blog posts, other internal pages and blog posts are all great fits for some internal links. They serve to assist visitors with navigation and they can be great for SEO to help the search engines identify what your content is about.
Be especially conscientious about cross-linking your blog posts and about linking to key pillar pages to help with rankings for your key topic clusters.
Choose your authors wisely.
Do you have only one person doing all the blogging? A team of specialists who will be sharing the load? Or a large team of people who are contributing only a random piece here and there? This will determine your author strategy as each author page will be linked to.
If you are going to have one person do all the blogging or a team of people only doing a few blogs each, you may want to forgo having author pages. They won’t bring much practical value to the table for the visitor. However, if you have a few specialists who are each blogging about their own expertise, then author pages are a great way to group similar content in a useful way.
Optimize your images
We’ve already touched on how optimizing your images by compressing and resizing them may greatly reduce the sizes of the images, decreasing the page size and improving page loading time. To do this you can use online image resizing and compressing tools as well as their offline counterparts.
When you’re adding images to WordPress, you’ll want to make sure they’ve already been optimized for size. It’s an extra step to resize your images but it gives you the chance to do any other touch-ups or crops that need to happen prior to publishing. You can also add the plugin Smush Image Compression and Optimization which can help you compress and optimize images in WordPress.
When you save your images, give them a descriptive name (i.e. tanya-wigmore-headshot.jpg instead of IMG00987_99.jpg). This should be directly relevant to what the picture is of, as well as the context for it in relation to your website. The same goes for adding in image alt tags. If I were adding that image to our website I might add the image tag “Tanya Wigmore, SEO” to it. Then, when the search engines come crawling they have strong indicators as to what this image might be about, which makes it more likely to rank in an image search.
Use Heading Tags Appropriately
When building your WordPress site try to avoid using heading tags in your template. Your main <h1> tag as the page title is great, but aside from that, your heading tags should be used in the content area of the page and not in the header, footer, side nav., etc. Usually when this happens, it’s because someone is using heading tags for formatting instead of using heading tags to identify the headings of the page.
You headings should start at H1 (the most important heading) and then be followed by H2 (sub-heading) or H3 tags (sub-sub-heading) as is appropriate. If you’re whipping out the H4 headings you might be getting carried away.
Integrate Social Media sharing buttons in your posts
We’ve turned off the comments and expect people to be sharing on social, so let’s give them the opportunity to do so! When you’re adding your social media sharing buttons, only use the platforms that you are actively using or that your audience is actively using. No need to be on SnapChat or Pinterest if that’s a deadzone for your audience.
Switch to a responsive design
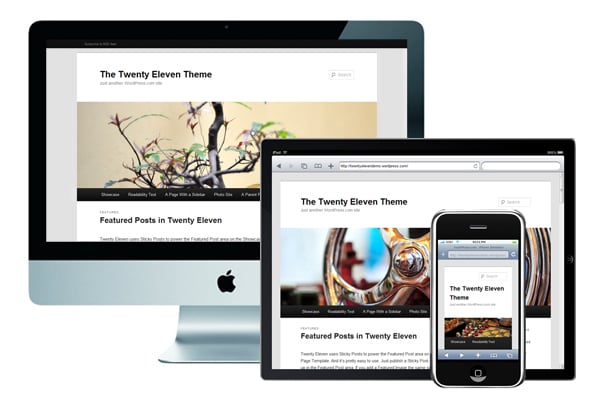
Google moved to a mobile-first index in 2018 and by the end of the year more than half of search results were being served from the mobile index. Google wants to serve a good mobile experience and to provide that, you need to have a responsive design that can be easily used by someone on their mobile. Not sure how your site stacks up? Use Google’s Mobile Friendly Test to find out.
Enable AMP
Google doesn’t just want responsive sites, they want FAST sites. So they build the AMP Project which is designed to speed up the internet and provide a lightning quick experience for all users. We recommend using the official AMP plugin for WordPress. It is important to note, though, that it may not be compatible with all themes out of the box. AMP is all about stripping out the unnecessary ‘weight’ of a page and if you have a site that relies heavily on JavaScript, CSS and other scripts, you may not be able to use AMP for all of your content.
Customize your robots.txt
If you don’t want Googlebot to crawl and index specific directories or pages of your site, you can block them straight from your robots.txt. Now with WP Robots Txt plugin for WordPress you don’t even have to have an actual robots.txt file present inside your WordPress installation directory, it will automatically create a virtual robots.txt for your site that works just as well as a real one. You can edit it anytime from “Settings -> Reading”. You can use this to block specific bots to crawl specific parts of your site, thus improving the SEO of it.
Enable breadcrumbs
Breadcrumbs give visitors (and search engines) a clear trail to ‘go back up a level’ from where they are now in your site. Breadcrumbs usually look something like this:

You don’t have to use them. But if you have a large site or a site that has a multi-layered hierarchy, there are many benefits:
- They help search engines understand the structure and hierarchy of your site
- They create a good internal linking structure
- They’re helpful to users
- They appear in Google search results

You can enable breadcrumbs via Yoast by clicking on SEO > Search Appearance and then choosing the “Breadcrumbs” tab.
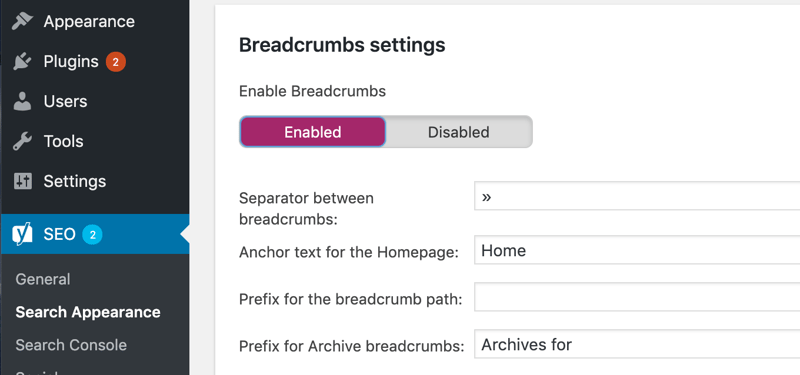
It’s worth noting that your WordPress theme must support breadcrumbs for this to work. Not all do and you might need to book in some dev time to be able to get this working on your site.
Verify your site in Google Search Console
When the site is ready to go, make sure you verify it with Google Search Console. This is an easy way to see where Google is having issues with your site, if you’ve been hacked, or if you have any broken links. It’s recommended that you continue to keep an eye on your Search Console well after website launch.

Other posts you may be interested in

How to Change Your Search Strategy for AI

Turn HubSpot into a Match Maker 💘 Recruitment & Candidate Matching Tools

Adhere To Data Removal Policies & Reduce Ediscovery Burden by Scrubbing Old Communications from HubSpot

.png)
.png)